(21.1) Understand graphic file formats and applications
1.1 describe graphic file formats and their applications with some appropriate use of subject terminology
There are many different formats when it comes to graphic file formats. At DCAS we do a lot of poster and leaflet designing. We generally work in either Adobe Photoshop or Illustrator. We tend to use a lot of PNG files for example when adding our logo and social media logos. These are images that have been previously exported with a transparent background. We always make sure we keep the original Photoshop/ Illustrator file until the client is 100% happy before sending them the final piece, which I usually save as a JPEG file. It also depends what the image is going to be used for. Some file formats may export larger and not all web browsers support all formats, as mentioned in other units.
(Also see Unit 35 (1.6)
Raster VS Vector:
There Are two types of image, "Raster" and "Vector". Raster images are made up of dots called pixels. Each pixel has its own colour value. These images are used for web as they don't need to be too big so they can load quickly online. If a raster image is stretched too much, it will distort and you get what is called pixelation. These images will usually have a low DPI of 72 and will be quite small. They will also be in RGB Colour Mode (Red, Green, Blue). Commonly used raster files are JPEGs and PNGs, often edited in software such as Adobe Photoshop which is the best option for me personally when editing for web.
Vector images are more mathematical, made up of geometric shapes: Points, lines, curves etc. They are much smoother and more satisfying to the eye. A vector image can be resized without any limitation, as it will never pixelate. When designing something for print rather than web, vectors will look a lot better. When sending a graphic document to print, the colour mode should be CMYK (Cyan, Magenta, Yellow, Black) with a PPI of 300. Good software examples for using vector images are Illustrator and Fireworks. Personally I use Photoshop and Illustrator, depending which one will best suit the job I'm doing. The most common vector file formats I use are AI (Adobe Illustrator) and PDF (Portable Document Format)
(Above: Setting up a document on Photoshop. I set my size for web, which could be even smaller still with a resolution of 72 DPI)
(Above: The document is automatically in RGB Mode)
(Above: Settings for if I was to design a poster for print. I set the size to be quite large and ensured the colour mode was CMYK and the PPI was at 300)
Metafile: When saving files, it's important to rename them rather than leave them untitled. This makes them easier to find. We can also view a file's information such as: file type, date created, date modified, size, location etc. I'm a Mac user so when the chosen file is highlighted, I press "Command" and "I" to view its information.
(21.2) Be able to use appropriate image design and manipulation software
2.1 use appropriate image design and manipulation software working within appropriate conventions and with some assistance
I was recently given the job of creating a poster for our DCAS open day from my manager. I decided to create it in Photoshop as I know may round it more than Illustrator and I only needed to create something quite simple.
I decided on a sunny image of the building for the background and very slightly lowered the opacity so the text would stand out more. After the text, I imported all the social media graphics and aligned them. As my line manager once worked in the printing industry, she was able to give me some feedback and helpful tips. At first some of the text overlapped the building so I had to move it so it was only on the sky. She also suggested the black box along the bottom so the contact information would stand out a lot better, also with the opacity lowered a bit so you can still see the image beneath. To stand the text out more I added some drop shadows and made sure I had used the ‘Helvetica’ font, which is the one we normally use.
Using Photoshop:
Photoshop is personally my favourite editing software to use. A few years ago I studied a beginners course to get to know the basics. Ever-since then, I have continued to play around, experiment and create various pieces of artwork for my online portfolio, continuously developing my skills:
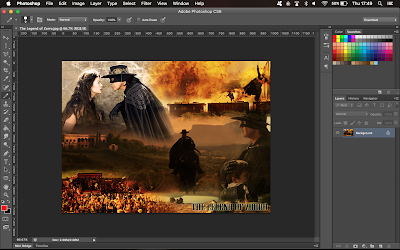
(Above: A screenshot of one of my favourite montages opened in Photoshop. Montages was one of the workshops we did on my course, which is when several images are blended and combined into one. I found this really enjoyable to do and it was a good way of improving my blending skills. Montages are also a good way of telling a story within one image. To create this I imported several images, around seven or eight and roughly arranged them on the canvas. Working on each layer individually, I created a layer mask which is the black circle in the white rectangle symbol at the bottom of the layers panel. This then puts a blank white rectangle against the layer you are working on. Ensuring this is selected, you can use your brush and opacity to blend the images together by taking parts out or adding them back in gradually)
On the left of the screenshot is the tool bar. There are many tools to discover and use in Photoshop. Here is a list of the ones I use most (from top to bottom):
Selection - Allows you to select images/ layers
Marquee - Draws various shapes allowing you to make selections
Lasso - This allows you to draw around a certain shape and cut it out
Magic Wand/ Quick Selection - This selects large areas, for example quick selection would be a good way of removing a large, smooth area of similar colours such as a sky
Crop - Allows you to select a certain part of an image
Eye Dropper - Allows you pick a specific colour value
Brush - Allows you to paint/ draw on top of an image
Clone Stamp - Allows you to select a part of the photo and paste it over another nearby part to blend it. This is a good way of disguising imperfections or fixing up old and damaged photographs
Eraser - Allows you to rub out parts of the image
Gradient/ Bucket Fill - Allows you to blend one selection from one colour into another. The bucket fill fills and entire selection where the pixels are all of the same colour
Blur/ Smudge - I sometimes use this to blend rough edges or to give an image a dreamy/ magical look to it
Pen Tool - This allows you to draw curved and specific lines from one path to another. I've only recently got used to this tool in Adobe Illustrator
Type - Allows you to add and edit text on top of your image
Shape - Allows you to draw shapes
Colours - On my screenshot, red is the foreground colour and black is the background colour. This means that currently red is my main 'fill' colour and black will be the colour of any outlines, known as the 'stroke'.
Below this is a symbol of a circle within a rectangle. This is called "Quick Mask Mode". When using the quick selection tool, it can sometimes be very fiddly trying to select which parts of the image you want to select and the bits you don't. By clicking this it highlights the parts in a colour which you can change at any time. This allows you to zoom far into the image and use the paintbrush to select every single little detail.
There are also many tools and options across the top of the screen. In adjustments you can alter the vibrance, contrast, brightness, exposure etc. Filters can also be added and the levels changed to give an image more punch. For anyone new to Photoshop or confident users, these are worth experimenting with.
You can also choose which windows you want open in the panel to the right. As a beginner on my course at the time, my tutor advised us to have open: layers, history and navigation as the main three. However it will depend on the project you are working on. Swatches is often needed when working with colours. Some high end projects may require having many windows open all at once. This is why some graphic designers will work between two monitors. I usually export PSD files as JPEGS, but again this may vary on the project.
Using Illustrator:
A lot of the tools in Adobe Illustrator are similar to in Photoshop, but you can do so much more when it comes to manipulation. Personally I find it a lot more difficult than Photoshop, but the vector graphics are so smooth and beautiful to work with.
(Above: Sleeping Cat Tutorial)
During my college tutor's Adobe Illustrator Course, she encouraged us all to practice various tutorials online whenever we got the chance. This gave us all the chance to get used to working with vector graphics.
As you can see from the tutorial link above, to say Illustrator looks a lot like Photoshop and has similar tools, the manipulation process is very different, depending on the project. It is more about the uniting and dividing of shapes rather than touching up a photograph. Different tools such as the warp tool can manipulate the shapes you create. Each shape/ line you create is known as a path. You can select, group, ungroup whichever paths you choose. For example, if you wanted to move only the plant at the bottom right of the cat tutorial, you would select all the paths that make up that plant and group them. This way you'd be able to move the plant without ruining the rest of the image.
Layering shape upon shape while slightly altering the colour gives artwork depth and an illustration effect. There is also a mesh tool where we all practiced with an Apple Tutorial:
As you can see, this takes a lot of patience and practice. Again, gradient blending skills are needed in this, it's all about the layering of colour to give the image depth and a 3D texture. From doing this tutorial, I can now see how this method would probably be used in the process of game designing. How the items would be created and go to and from various software for the next step in the process.
(Above: My Apple Mesh. Not bad for a first attempt!)
(21.3) Be able to produce digital graphics in response to a brief
3.1 design and produce digital graphics in response to a brief working within appropriate conventions and with some assistance
It turned out that we had another event on the 5th December, ‘YouthInc’s’ 2nd anniversary, another company under Derbyshire County Council. This meant I had to make last minute changes to add this information to the poster. This is why it is important to keep the original editable file until the print is final. They only wanted something simple added on so I added another black box with lowered opacity, added some text and their logo PNG.
The final image was sent off and I received feedback on a few alterations I needed to make. While the poster looks eye-catching in digital format, I was told that the text wasn’t quite bold enough on the printed out poster.
My line manager used her print knowledge to make some final alterations.
She made the title text more bold and aligned the writing to the left. She also changed the title to all white as it was a lot easier to notice from a distance.
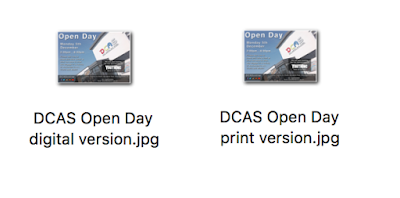
My manager also wanted a digital copy for emailing out to people. Because of this I made two versions, one at 72dpi for the digital copy and one at 300dpi for the poster. It’s important that the resolution is suitable depending on what the image is going to be used for. This is why images from the internet often print out in poor quality, because they were designed to be used for web rather than print, as mentioned in some of my other imagery units.
(Also see Unit 35 & 36 Above)
Last year I had to design a flier for the Dance Session. Please see (35.2) of unit 35 in the top link above. I used Photoshop to design an A5 sized flier for print. If the brief had been for any bigger I would have no doubt been advised to use Illustrator instead to avoid pixelation, but this was before my knowledge of the software was as good. The dance teacher knew what he wanted, so I created several designs and kept him informed at each step of the process. I had to make a lot of changes, because the colours on-screen were totally different to how they came out on print. I used a lime-green graffiti font which I downloaded, so it would appeal to young people and express the style of dance they would be learning, 'Street Dance'. I also made sure it complimented the bright colours of the background image I used. Since that job, I have learnt so much more about digital imagery and sizes etc. If I was to do this again, I would use Illustrator and double check on my sizes and resolution.
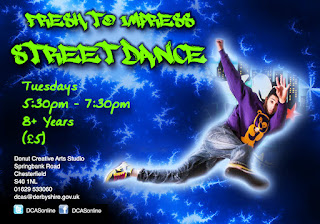
I recently found the image and checked its size. It was 1056 x 740 pixels wide, but the resolution was on 72 DPI. For print, it should have been much higher and on CMYK colour mode. By doing this apprenticeship I have learnt so much more about the importance of image sizes and quality, depending on what the image is to be used for.
More Of My Work from DCAS:
(Above: Facebook Banner session designs. When it comes to things like social media and uploading images, you will be asked to crop it to the area you want to be shown. Sometimes it's easy to move an image around until you're happy with how it will look, but it's not always the case. If you want your whole image to show, whether it's your profile picture or a cover picture, YouTube banner etc, it's important that your image is the same size as the dimensions required. This way, your entire image will be on show)
(Above: Session flier and Sticker Design Idea. Looking back, the sticker design should definitely have been done on Illustrator. Before working at DCAS, I've only ever really created digital content to be shown online. Now I've had more experience in print, I can see the vast difference in settings and how effective and important it is)
(21.4) Be able to reflect on own digital graphics work
4.1 comment on own work with some appropriate use of subject terminology
I felt happy about the composition of the poster with the text on the blue sky and the DCAS building to the side. I thought the image I chose was a good example which demonstrated the rule of thirds and had a nice large space for the text. My personal favourite thing about it is the bottom black box with the social medias on. I feel the colours look nice against the black, and the way it runs along the bottom sort of gives off a lower third effect which is used in film editing.
(Also see Unit 35 & 36 to see my Photoshop and Illustrator work. I originally had a strong knowledge of Photoshop, but by doing my apprenticeship, myself and my colleagues were put on an Illustrator Course by our tutor. I found Illustrator a lot harder to use, but we all learnt some interesting techniques and had a go at some exciting tutorials. My favourite one was the mandala workshop because I love swirling patterns and shapes. I found it really pretty and by editing one segment it repeated the pattern all the way round the circle. Since the beginning of the apprenticeship, I've improved on my digital graphics skills and gained a much stronger knowledge of Adobe Illustrator.)
As someone who has only really ever created artwork for web use, I've become a lot more aware of digital graphics for print, and how sizing and resolution makes a huge difference in the quality of the final product.




No comments:
Post a Comment